Tinkercad is a popular online 3D design and modeling tool that allows users to create virtual prototypes, circuit designs, and more. It offers a wide range of pre-built components that can be used to bring your designs to life. However, there may be instances where you need to add new components to Tinkercad that are not already available in its library. In this article, we will explore various methods to add new components in Tinkercad and expand your design possibilities.
Adding Custom Components
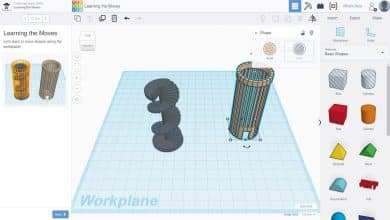
1. Importing 3D Models
One way to add new components to Tinkercad is by importing 3D models. Tinkercad supports the import of STL (Standard Tessellation Language) files, which are widely used for 3D printing. You can find numerous websites offering free or paid 3D models in STL format. Simply download the desired model and follow these steps:
- Open Tinkercad and create a new design.
- Click on the “Import” button located on the top toolbar.
- Select the downloaded STL file from your computer.
- Tinkercad will import the model and place it in your design area.
- Resize, rotate, or modify the imported component as needed.
2. Designing Custom Shapes
If you can’t find a suitable 3D model for your component, you can create custom shapes directly in Tinkercad. Tinkercad provides a set of basic shapes like cubes, spheres, cylinders, and more. You can combine and manipulate these shapes to design your custom component. Here’s how:
- Open Tinkercad and start a new design.
- Drag and drop the desired basic shapes from the shape menu on the right side.
- Use the alignment tools to position and align the shapes accurately.
- Select multiple shapes and use the “Group” option to merge them into a single component.
- Apply additional modifications like resizing, rounding edges, or adding holes.
3. Using Code Blocks
Tinkercad also offers the ability to add custom components using code blocks. With the CircuitLab integration, you can write code to create custom electronic components and simulate their behavior. Here’s how to use code blocks:
- Open Tinkercad and create a new circuit design.
- Click on the “Code” button located on the left toolbar.
- Choose the component you want to create or modify.
- Write the code using the available blocks and functions.
- Test and simulate the component’s behavior using the circuit simulation feature.
Sharing and Collaborating on Components
Once you’ve created or imported your custom components in Tinkercad, you can share them with others or collaborate on projects that use these components. Tinkercad provides various options for sharing and collaborating:
- Public Gallery: You can publish your designs and components to the public gallery, allowing other Tinkercad users to access and use them in their own projects.
- Sharing Links: Tinkercad allows you to generate sharing links for your designs or components. You can send these links to others, who can then view or modify your creations.
- Collaboration: Tinkercad supports collaboration on designs, enabling multiple users to work together in real-time on a single project. You can invite others by their email addresses and assign them specific permissions.
FAQ
1. How do I Import Arduino into Tinkercad?
To import Arduino into Tinkercad, follow these steps:
- Open Tinkercad and create a new circuit design.
- On the left toolbar, click on the “Components” button.
- In the components menu, select “Arduino” from the list.
- Drag and drop the Arduino board into the design area.
- You can now connect other electronic components to the Arduino board and program it using code blocks.
2. How do you add electronic parts to Tinkercad?
To add electronic parts to Tinkercad, you can choose from the available components in the Tinkercad library. Here’s how:
- Open Tinkercad and create a new circuit design.
- On the left toolbar, click on the “Components” button.
- In the components menu, browse through the categories and select the desired electronic part.
- Drag and drop the component into the design area.
- Connect the component to other parts of your circuit as needed.
3. How do I Import a 3D model into Tinkercad?
To import a 3D model into Tinkercad, you can follow these steps:
- Open Tinkercad and create a new design.
- Click on the “Import” button located on the top toolbar.
- Select the downloaded 3D model file (in STL format) from your computer.
- Tinkercad will import the model and place it in your design area.
- You can resize, rotate, or modify the imported component as necessary.
4. How do I use Arduino Uno in Tinkercad?
To use Arduino Uno in Tinkercad, follow these steps:
- Open Tinkercad and create a new circuit design.
- On the left toolbar, click on the “Components” button.
- In the components menu, select “Arduino” and choose “Arduino Uno” from the list.
- Drag and drop the Arduino Uno board into the design area.
- Connect other electronic components to the Arduino board as required.
- Program the Arduino Uno using code blocks or by writing Arduino code.
5. How do you make a combination circuit?
To make a combination circuit in Tinkercad, you can follow these general steps:
- Open Tinkercad and create a new circuit design.
- Add the electronic components you need for the combination circuit.
- Connect the components using wires.
- Depending on the combination circuit you want to create (e.g., series-parallel, parallel-series), arrange the components and their connections accordingly.
- Test and simulate the combination circuit using the circuit simulation feature in Tinkercad.
6. How do you connect two breadboards in Tinkercad?
In Tinkercad, you can connect two breadboards together by using wires. Follow these steps:
- Open Tinkercad and create a new circuit design.
- Add the two breadboards to the design area.
- Connect one end of a wire to a terminal on the first breadboard.
- Drag the other end of the wire to the desired terminal on the second breadboard.
- Release the wire, and it will connect the two breadboards.
- Repeat the process for other connections between the two breadboards.
7. How do you make a series circuit in Tinkercad?
To make a series circuit in Tinkercad, follow these steps:
- Open Tinkercad and create a new circuit design.
- Add the electronic components you need for the series circuit.
- Connect the positive terminal of the first component to the negative terminal of the second component.
- Continue connecting the components in the same way, maintaining the sequence of positive and negative terminals.
- The last component in the series should have its negative terminal connected to the ground (GND) or the negative side of the power supply.
- Test and simulate the series circuit using the circuit simulation feature in Tinkercad.
8. What is Tinkercad simulator?
Tinkercad simulator is a feature within Tinkercad that allows you to simulate the behavior of your electronic circuits before physically building them. The simulator provides a virtual environment where you can test and debug your circuit designs. It allows you to visualize the flow of electricity, measure voltages and currents, and observe the effects of component interactions. The simulator helps you identify and correct potential issues in your circuit designs, saving time and resources.
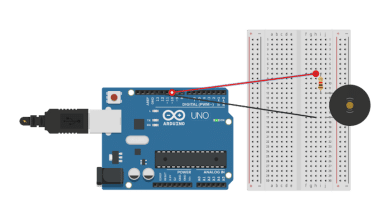
9. How do I make an Arduino circuit?
To make an Arduino circuit in Tinkercad, you can follow these steps:
- Open Tinkercad and create a new circuit design.
- Add an Arduino board to the design area by selecting it from the components menu.
- Connect other electronic components to the Arduino board, such as LEDs, resistors, sensors, etc.
- Use wires to establish the necessary connections between the Arduino board and the components.
- Write or drag and drop the Arduino code blocks to program the Arduino board.
- Test and simulate the Arduino circuit using the circuit simulation feature in Tinkercad.
10. What are the limits of Tinkercad?
Tinkercad has certain limits and constraints that users should be aware of:
- Design Complexity: Tinkercad is best suited for simple to moderately complex 3D designs and circuit simulations. Extremely intricate designs may not be feasible due to processing limitations.
- File Size: Tinkercad has a file size limit for 3D models, and exceeding this limit may result in difficulties with uploading or processing the design.
- Component Library: While Tinkercad offers a wide range of components, there may be specific components or variations that are not available in its library.
- Real-Time Collaboration: The collaboration feature in Tinkercad allows simultaneous editing by multiple users, but there may be limitations in terms of the number of collaborators or the complexity of the design.
- Advanced Features: Tinkercad is more focused on simplicity and accessibility, so it may not have the advanced features or capabilities found in professional-grade design software.
11. Where is the Arduino in Tinkercad?
In Tinkercad, you can find the Arduino board in the components library. To access it, follow these steps:
- Open Tinkercad and create a new circuit design.
- On the left toolbar, click on the “Components” button.
- In the components menu, select “Arduino” from the list.
- Choose the specific Arduino board model you want to use, such as Arduino Uno, Arduino Mega, etc.
- Drag and drop the selected Arduino board into the design area to add it to your circuit.
12. How do I add a component in circuit Io?
To add a component in Circuit.io (now part of Tinkercad), you can follow these steps:
- Open Circuit.io (Tinkercad) and create a new circuit design.
- On the right side of the screen, click on the “Components” button.
- In the components menu, browse through the categories and select the desired component.
- Drag and drop the component into the design area.
- Connect the component to other parts of your circuit as needed.
13. Where is circuit assemblies in Tinkercad?
In Tinkercad, the “Circuit Assemblies” feature allows you to create more complex circuits by combining multiple smaller circuits. To access the Circuit Assemblies feature, follow these steps:
- Open Tinkercad and create a new circuit design.
- On the left toolbar, click on the “Code” button.
- In the code menu, select “Circuit Assemblies” from the list.
- The Circuit Assemblies editor will open, allowing you to create and arrange circuit modules.
- You can add and connect multiple circuits within the Circuit Assemblies editor to create more advanced designs.
14. What is Arduino in Tinkercad?
Arduino in Tinkercad refers to the integration of Arduino boards and programming capabilities within the Tinkercad platform. Tinkercad allows users to add Arduino boards to their circuit designs, connect electronic components to them, and program their behavior using code blocks or Arduino code. This integration provides a seamless environment for experimenting with Arduino-based projects, simulating their functionality, and learning about electronics and programming.
15. Can you import STL into Tinkercad?
Yes, you can import STL (Standard Tessellation Language) files into Tinkercad. STL is a widely used file format for 3D models, especially for 3D printing. To import an STL file into Tinkercad, follow these steps:
- Open Tinkercad and create a new design.
- Click on the “Import” button located on the top toolbar.
- Select the downloaded STL file from your computer.
- Tinkercad will import the STL model and place it in your design area.
- You can resize, rotate, or modify the imported component as necessary within Tinkercad.
Conclusion
Adding new components in Tinkercad expands the possibilities for your 3D designs and circuit simulations. Whether you import 3D models, create custom shapes, or use code blocks, Tinkercad offers versatile options to enhance your projects. Additionally, the sharing and collaboration features enable you to connect with a larger community of creators and foster collaborative innovation. Start exploring the world of new components in Tinkercad today and unlock your creative potential.